Showing posts with label kitchen. Show all posts

Tuesday, August 11, 2026

Adapting

With the rise in technology and innovation, I think we're losing our ability to adapt. When we run out of something, we get in our cars and drive to the store. When we need something fast, we order it from Amazon. When something breaks, we immediately go buy a new one to replace it. While none of these are bad reactions in any way, we've forgotten how to "deal with it." We don't text a neighbor if they have any sugar because we don't really know our neighbors anymore. We don't think of ways how to go without something we don't have for a time. We don't think how to fix something before buying a new one. 

I had this thought because our kitchen sink has been causing us problems for nearly two weeks now. We discovered the water hose up the faucet was leaking. Our kitchen faucet has a lifetime warranty so we filed a claim. They were going to ship us a new part. Great! We just had to wait for it. This wasn't so bad. The worst part was anytime we pulled down the sprayer in our kitchen sink, another stream of water from the hose would shoot out. It would spray out and splash onto other nearby items. What was the worst thing that happened? I got an unexpected wet spot on the front of my shirt one day while rinsing dishes. Oops. 

Once the new part came, it was supposed to be a quick fix. There was a quick release to disconnect the broken hose and we'd attach the new hose. Simple, right? Well, it was supposed to be....

Turns out, when we released the broken house, the quick release collar also broke and wouldn't hold the new hose in place. We tried. Water sprayed everywhere. We had a soaking cabinet. 

We tried looking online for a replacement part. It wasn't easy to find. Any places which had it would need to be shipped to us and would take at least a couple days. Home Depot and Lowe's don't carry this part because it's too specific.  It's literally a less than $5 piece of plastic that we need to hold our hose together. 

Without any quick solutions, I contacted customer service again and they found the part to ship us. Again, it was covered under warranty so we didn't have to pay anything. We would just have to wait.....another week for it to arrive.

I've still reached for it or walked to the sink intending on using the faucet multiple times.
 

Thankfully, we could keep the water to the house on while we waited for this repair. We just couldn't turn on the kitchen faucet or we'd have a water feature underneath the sink. How did we cope?

We save water from our bathtub in laundry detergent jugs. I really thought I had written about it before on my blog and had hoped to link it, but I couldn't find it. In short, we save water and it came in handy to use as dish-rinsing water during this time of inconvenience. 

This water helped to rinse anything that could go into the dishwasher. For anything needing to be hand-washed, we carried it outside in a basin and used the hose to wash dishes. Honestly, it's not so bad. Our grass gets some extra water in very localized areas it wouldn't ordinarily receive, food bits are kept out of our bathroom sinks and bathtub drains, and everything gets clean as it usually would, just from a different water source and location. 

All in all, I wouldn't call this that inconvenient. All I have to do is take the dishes outside to wash. I still have running water. We still have dish soap. I have a sponge to scrub everything. And most of all, we have a working dishwasher to do 50-80% of the daily dishes. 

I received the shipping confirmation from the company for the broken part. I'm hoping to receive the piece by this weekend so we can have it replaced and use our kitchen sink again by next week.  As much as I hate to say it, doing the dishes this way probably saves me water compared to washing it all in the kitchen sink. I've learned to rinse dishes for the dishwasher with one gallon of water per meal. I definitely use more than a gallon of water rinsing dishes after a meal when it comes out of my kitchen faucet. Maybe I need to permanently keep a basin in the kitchen sink to hold water to rinse dishes so I'm not running the faucet as long. 

This week feels a little inconvenient, it can be laborious, and it can seem very frustrating. We've had to change our routine and habits. I've had to stop myself from accidentally turning on the kitchen faucet. But if I didn't write all this down, I think the events of this week would be forgotten in a few weeks or months, and definitely years. Our broken hose connector and the week we washed dishes outside would just file into the long lost memories of our family. 

Never stop forgetting how to adapt. It makes everything smoother, even when it's really not.  

Thursday, July 16, 2026

Storage: Eggs!

As my kids get older, the amount of food we consume has increased.  One grocery item specifically is eggs. We can go through a dozen eggs in about two days depending on what I'm cooking. Because of this, I've started buying eggs from a wholesaler near us. I can get 30 eggs for $2. These are not the kind of eggs I would be making homemade mayonnaise with or using raw, but for how I use eggs, they fit the budget and work for us. 

Because of our refrigerator is constantly holding over 15 eggs at a time, I needed a better way to store them. Back in April/May, we were at the store browsing and came across egg drawers. The idea was cool but I couldn't fork over the money. They were around $12 each to store 18 eggs. The plastic felt thin and cheap. Some of the ones on the shelf were already cracked. I looked online to see what else was out there and found ones sold at The Container Store. These were over $20 each. We didn't end up purchasing anything. 

Earlier this month, we were facing an egg surplus in our refrigerator. I always like to have eggs on hand because they're an easy meal-maker if I don't feel like doing any serious cooking. This time though, I overdid it a bit. We still had eggs at home and I added to our collection by buying another 2.5 dozen from the store. What resulted was 43 eggs in our refrigerator at one time. 

I saved egg cartons from the stores that hold two dozen, but I didn't have enough to hold all 43 eggs. What resulted was a weird mishmash of three containers in our refrigerator to hold them all.  


Chaos.

Storing these eggs precariously in our refrigerator like this drastically reduced our storage space. I couldn't put anything on top of the eggs in this level anymore. It is true this setup doesn't stay forever as we eat the eggs, but it does make for an inconvenient use of our refrigerator for at least a few days. As we ate the eggs, I rearranged them in the fridge to be more organized, but even so, it wasn't ideal. 

I was able to consolidate the eggs to one side of the shelf, but still 
couldn't stack anything on top. The ones in the bowl are raw.

After enduring these days of precariously storing eggs in our refrigerator, I decided again to look online to see what was out there. I remember seeing The Container Store advertise their big clearance event. I had even browsed a few pages of their clearance online for fun but didn't see anything worth purchasing. This time, I searched their egg storage again. Did I get lucky?

I did! They were 70% off regular retail so I was able to get two for the price of one. I've purchased their brand of organizational bins before so I knew their plastic quality was much better than the ones I'd seen at the other store a few months prior. I ordered two of them and waited patiently for my in-store pickup confirmation. The eggs in my refrigerator are now organized nice and neatly in two stacks of 18 (when maxed out).

Open.

Closed. I should probably remove the front stickers...
 

I am super happy with how this turned out! I have room for 3 dozen eggs in my refrigerator now, and if somehow I happen to have overflow, they're going to live on top for a little bit in my half dozen carton. It is true my refrigerator will have two egg drawers taking up space on this shelf even if I have zero eggs in my refrigerator. The likelihood of that is pretty slim though. Regardless, this organization works for us because I know exactly how much space I have in my refrigerator to use and it will not be affected by how many eggs I need to store. 

If you want your own egg storage drawers at a good price, they still have some left (in my area)! Not sponsored by The Container Store. 

Tuesday, March 31, 2026

Dehydrating #5 and #6

Life has been busy. I'm finally getting around to writing the next part of my dehydrating series! 

Apple Chips

I made apple chips! Typically, I'm not a fan of apples. I think I've been scarred growing up eating fruit. My dad didn't cut the core out of the apple. He would just cut the apple and hand me and my brother each a half. I ate around the core but did so pretty sloppily so a lot of the apple went to the trash. I'd also get in trouble for eating it sloppily so I hid my apple trash in various places around the house so they wouldn't be found. Needless to say, I don't have good memories eating apples.

Lesson to parents: just cut the core out of apples for your kids. Do it forever if you can. One day they will notice.

I bought apples specifically to dehydrate for this "experiment." They turned out well! It made me actually want to eat apples.


It's been so long I honestly can't remember what temperature I dehydrated them at anymore. I would think I did about 135 degrees for 8-10 hours as that is pretty standard for dehydrating. I did both regular apples and cinnamon apples. My preference was for the cinnamon apples because they had a sweetening effect on the apples. 

As you can see from the photo, I had to cut my apple in half and then slice into semi-circle shaped slices. Ideally, I would have loved to be able to slice them in a donut shape with the center cored out. However, my mandolin would not fit my apple all the way across in diameter so I had to slice. They are more aesthetically pleasing as cored out rounds, but that would also affect the dehydrating time because the pieces would be larger. 

Kani Crab

I was inspired to try dehydrating Kani Crab because I saw someone do an air fryer recipe. I actually tried the air fryer recipe in our toaster oven as well and it didn't turn out like the video...so I adapted it for myself.

The consistency of these was not there because I bought kani in strips and pulled them apart by hand. The pieces were not evenly sized so they cooked at different rates. Some pieces were perfect, some were still on the chewy side, and some were overcooked and too brown. 

I attempted to make this two times. The first time, my temperature was too high and the pieces were uneven so we had a gamut of overcooked, perfect, and not cooked enough.  The second time, I think my temperature was too low but the pieces were more uniform. As a result, they ended up hard and tough, not light and airy as I'd hoped. I think I'd aim for a temperature of around 380 degrees for 15 minutes and tweak from there if I were to try again. 

The video I originally saw was great inspiration to make these, but the results just didn't turn out as I'd expected. There was a lot of flavor within each piece, but because I didn't perfect the cooking instructions, it wasn't completely enjoyable for the work it entailed. If I were to commit unlimited time and resources, I would further develop this recipe. However, I don't think I will.

Wednesday, February 25, 2026

Dehydrating #4: Green Onions

During the winter, green onions become more expensive and Costco stops carrying them for a while because they're more expensive to source. We were at Costco last week and found them again! I don't think I'll actually be buying my green onions from Costco anymore as I found a new grocery store nearby with better pricing, but this batch was from Costco.

We got so excited we bought 3 bags: 6 pounds of green onion. Normally, I don't buy this much at one time. However, I had come across the idea of dehydrating my own green onions at home a few months ago. To my dismay, that's when green onion prices were going up so I had to wait a while to get them again in bulk.

Green onions took a long time to dry. I didn't cut them into especially small pieces because I didn't want them falling through my grates. Most of mine were cut into 1-1.5 inch pieces. I didn't end up separating the greens and whites because it was experimental so I was just going to see what would happen. 

 
I ended up filling five trays of green onion into my toaster oven. I used the dehydrate setting and put it at 135 degrees F. The original time was set for 10 hours and I ran it overnight. The next morning, I went to check and the vast majority of them were not dry enough to store. I maybe removed one tray of the smaller greens which had finished dehydrating, but the rest of the pieces were left in the oven again to continue.
 
At the end of the day, the thickest pieces needed about 26-30 hours of dehydrating before they were dry enough to store. I put them into glass jars and added a silica gel packet to each jar. I have a ton of these from the probiotics I take so I'm glad to have another use for them besides simply throwing them away.  

They're really just a healthier version of the "vegetable" packet you receive when you make instant noodles. But I like that they're healthier and I know it's a pure green onion. Because I cut my pieces larger, they're still on the larger side even dehydrated. It's so convenient to be able to store them in my pantry and just toss some into a dish as I'm cooking.

I do think these work best for soups and stews because if they don't re-hydrate with enough moisture, the texture is a little strange to eat. I have an idea to grind some up into smaller pieces and adding to food that doesn't require a lot of moisture as a garnish. 

Personally, I do still enjoy having diced pieces of green onion in my freezer. It mimics the fresh green onion feel without having to keep it fresh in the refrigerator all the time. My freezer space is very valuable so being able to store it in a cabinet or pantry is a plus as well. I think I will try to keep some of both in the house so depending on the various dishes I'm making, I can choose to use the freezer stash or the pantry stash.

If I were to dehydrate these again, which I probably will, I would definitely separate the whites from the greens. If not completely, I would at least put them on separate trays when dehydrating so I can just remove the trays of greens first and keep the trays of whites in longer.  

Another change I would make is the shape of the green onion. I wouldn't necessarily cut them smaller, but I would cut them on a bias instead of cutting them straight into cylinders.  This exposes more surface area and would shorten the drying time very slightly because all the moisture is held between the layers of the green onion. Cutting it on a bias opens up the layers more.

Another thought I had would be to keep the root of the green onion intact and slice it lengthwise into skinny strips and dehydrating the whole green onion that way. I don't know that I could use the green onion in that shape directly, but it would also be a way to speed up the dehydrating process because there is so much moisture inside the layers, especially at the bottom.  

I'm about to chop up the remainder of my green onions to add to my freezer stash! 

Tuesday, January 27, 2026

Dehydrating #3: Shrimp

Making my own dried shrimp was one of the earlier ideas that popped into my head after we got the new toaster oven. Dried shrimp is known for being more expensive than regular shrimp because the flavor is so much stronger. You don't have to use as much at one time, but it's more versatile because it is dried. When we went to Taiwan last year, I really wanted to bring some back. I saw someone selling a giant bag of dried shrimp at a market one evening but never got around to purchasing it to bring back home. I cannot legally buy it from the market to bring back because it is not properly packaged and labeled. By the time we were getting ready to leave, I didn't make a last minute grocery store trip to bring any home. I talked to a friend about it and she had said some of her friends tried bringing it back before but it is tricky because of the refrigeration. So from the time it gets packed into the luggage in Taiwan and makes it back to your home in the states, many hours (a day?) have passed and the quality may have been affected. 

I had done some research online and they said to dehydrate your own shrimp, start with cooked salad shrimp. This saves the step of needing to boil the shrimp before. I was at HEB getting some groceries when I saw a bag of salad shrimp. I spontaneously decided to get a bag and try making my own dehydrated shrimp at home that weekend. I honestly didn't even pay a very good price for the shrimp. The bag cost me about $7.00 and these were a pound of 150-250 size cooked shrimp. I can get a bag of the same size for uncooked shrimp and save $1.50. I think I can boil my own shrimp at home for less than that. 

Regardless, it was a capturing-the-time moment so I was already at HEB, the shrimp was in front of me, and I bought it. 

Dehydrating the shrimp wasn't difficult. I took the shrimp and laid it out on my dehydrating trays. I set the oven to 135F and the timer for 10 hours. I peeked in a few times to check on the shrimp, but when they were done, they were dry and felt just like the store-bought ones.  

 
My husband was smart. I didn't think about this, but it was a Friday evening to Saturday morning when I dehydrated them. At the time I had asked him, do you want to do the dehydrated shrimp first or *item number 4* first? He told me to do the shrimp first because I wasn't teaching over the weekend so it would give the house some time to dissipate the smells. Boy was he right. 


I'm happy with how my shrimp turned out. They look just like the ones from the store. The size of mine are a little smaller because I probably started out with smaller shrimp to begin with. I buy the size M from the store so they probably start with size 75-125 shrimp or so. The yield was similar. My pound of shrimp turned into 77g of dehydrated shrimp. The packs from the store have 100g of dried shrimp in them. 
 
When they're on sale at the grocery store, I can get the bag on the left for less than $7. The jar of dehydrated shrimp on the right I made myself cost me $7 in shrimp and time/electricity to dehydrate myself. 
 
I don't think I'll ever dehydrate my own shrimp again. The cost breakdown doesn't make sense and my whole house smells like a seafood market for about a half day. If I had access to bulk seafood at super discounted prices, my response might be different. But, for where I live and what I have access to, making it myself won't be cost efficient.  I'm glad I did it once just to have the experience and know-how. But now, I also know that paying for a bag of dehydrated shrimp from the grocery store really isn't that expensive. 

Wednesday, January 21, 2026

Dehydrating #2: Squash

We were at the grocery store one day leisurely pushing the cart around the store. I think we only had one item on our list which was already in our cart. Everything else was bonus. We passed the produce section, and I asked my husband, do you want to try zucchini chips? He okayed the idea so I went to get some.

Now I was a little confused for a bit because the signage in the store said zucchini but the label on the bag said squash. I never really looked into the difference between the two, but the vegetable looked correct for what I wanted, so I bought it and just thought, "I guess I'm making squash chips instead." Turns out that zucchini is a type of squash, but not all squash are zucchini. This makes sense to me as I'm used to seeing squash as a large gourd with tough skin.

I used our mandolin to thinly slice the squash into rounds. I seasoned with a few spritzes of oil and the slightest bit of salt. I placed them into our toaster oven and had to jerry-rig a two-tray system. This was before I bought the extra air fryer baskets for dehydrating. I ended up using the wire rack as my second tray. The slices did begin to curl around the wires as they cooked, but the overall flavor and texture were not affected. They just ended up looking a bit wavy. 

 
I found that 135F at 10 hours was a good amount of time to cook squash when sliced into round discs. I made these another time with oblong slices and didn't increase the cooking time - that was a mistake. The second batch with oblong slices was not as crispy as the first batch.  


These chips were so delicious. A lot of them were consumed while sitting in bed watching television in the evening after the kids went to sleep. For me, these were tasty enough to crave and serve as a substitute for potato chips. Now that I have extra dehydrating trays, I can dehydrate 6 squash at one time - it came out to about one squash per tray. 

I told my kids to try these and they did but weren't as impressed as I was. They would still prefer regular chips over these any day. Their palette is still young and immature. 

I really enjoyed making these squash chips and they will definitely be on my list to make again.  

Tuesday, January 13, 2026

Dehydrating #1 : Kiwi

We've had the same toaster oven since we got married which meant it was just over 11 years old. There was nothing wrong with it - still fully functioning - but our family has changed in the last decade and our needs are different. I found myself wishing I could heat more food in it at a time - if we had chicken and french fries, I couldn't heat enough for our whole family at one time. I could barely heat enough for both my kids at one time. 

This led to some searching online and buying a new toaster oven that was much larger and had more features than our old toaster oven did. The main reason we bought this one was for the size. It's advertised to hold a 20 lb turkey! I don't think I will ever roast a 20 lb turkey in my toaster oven, but it's nice to know the size is there if I ever truly need to. In addition to the size, I was intrigued by the features, primarily, the dehydrating feature. This oven has digital temperature settings as well as a digital timer, neither of which our old toaster oven had. 

We use our new toaster oven a lot to reheat food and toast bread. That's a given. Four years ago, I did an experiment by counting the number of times I used each of our small appliances.  Three specific ones were excluded from the count because I knew we were going to use them all the time and therefore, it wasn't necessary to tally each use. The toaster oven was one of them. 

The first item I wanted to dehydrate was kiwi. I don't even buy kiwi on a regular basis, but it was the first food I immediately thought of when I ventured down this dehydrating path. When I lived overseas for a year, I was exploring a market one evening and came across a booth selling dried fruits and nuts. I saw the dried kiwi and knew I had to try it. It looked so beautifully green and round. I bought a pack (I want to say it was around $5-7USD per pound...?) and just as they appeared, they were delicious. It was a burst of sweet kiwi in my mouth with every bite.

13 years later, I dehydrated my own kiwi. A grocery store had them on sale after we bought the new toaster oven so it seemed like the perfect signal. I was going to dehydrate my own kiwi! I sliced them about a quarter inch thick and laid them out on my rack. The toaster oven automatically set the temperature to 135 degrees F and 8 hours on the dehydrate function. I let it run overnight and the next morning, I had my very own dehydrated kiwi.

It wasn't as beautiful as the bag I bought. The green wasn't as vibrant - they definitely colored theirs. And my kiwi wasn't as sweet as the ones I bought - they added sugar. But it was delicious in a naturally unaltered tart kiwi kind of way. An online blog described it rather well: like a homemade sour gummy candy. 

I really enjoyed them. It was a fun first try with dehydrating! 

Thursday, December 4, 2025

Takeout with the Tos # 26: Long-term Storage

It's been a little bit hectic with the holidays coming and the end of semester drawing nearer. My cooking still happens but I've been doing a lot of repeats and there's not a lot to expound upon when I've made the same dish 3-5x already this year.  

We ran out of food halfway through this week so I had to figure out some dishes to cook. It's also been cold and rainy and I didn't feel like going to the store to buy anything so I had to use what we already had. I also wanted dishes with some vegetables in them.

How do I get vegetable dishes cooked Asian style without buying anything fresh? Let me tell you how!

My three dishes which meet the above quota are:

- Peas and Shrimp: $13.99

- Turnip Greens with Dace : $13.99

- Stir Fry Bamboo, Water Chestnuts, and Bell Peppers: $11.99

Total: $39.97

Tax: $3.30

Grand Total:  $43.27


Peas and Shrimp

Both of these are in my freezer. I have a bag of frozen peas in my freezer almost at all times. There was a phase when my kids wouldn't eat peas because they influenced each other to not like peas. Now I'm trying to reverse the habit. I finally got the younger one to eat some and I'm trying to get him to influence the older now. 

Shrimp is always in my freezer. This dish comes together super quickly. My dad used to make this dish as part of our food rotation when I was in high school. I enjoyed the way he made it. It wasn't super saucy and I actually don't know what he put in it - probably soy sauce or some combination of an Asian sauce - but it was good. 

I start by heating up some oil in my wok and then adding the shrimp (1/2lb?). When the shrimp is about 85% cooked, I add in thawed peas (1.5 cups?).  I mix it around for a bit, added oyster sauce (approx 1TB?) and a light sprinkle of sugar and salt. Make sure the shrimp is cooked all the way through and no longer translucent. That's about it.

If you're not into Asian food or it's not easily accessible, I bet adding some garlic and butter would make a great sauce for the shrimp and peas! Think shrimp scampi with peas. 


Turnip Greens with Dace 

I never thought about freezing bags of vegetables until my friend told me she did it all the time. This one is great because bags of pre-washed and cut turnip greens can be found at many grocery stores and aren't specifically "Asian." If you're super chill and want convenience, throw the whole bag into the freezer and save it for when you need it. This is what I do. If you want to go for a little more work before the convenience kicks in, you can open the bag, sort out some of the larger stem pieces, rewash if you'd like, spin dry, and then save in a Ziploc bag in the freezer. This is what I wish I would do sometimes but am realistically too lazy to ever do it. Laziness is a form of efficiency, remember? 😜

Canned dace has become a new staple in our house. I ate it in dishes as a kid and then forgot about it for a while until Woks of Life jumpstarted my memory with this recipe. This was the initial inspiration for my dish. I hardly ever make this with fresh greens because if I'm making this dish, it usually means I don't have any fresh vegetables for one reason or another. I also like to make my dace super small instead of the larger chunks because it is pretty salty and I want it evenly distributed with my greens.

For this dish, I first empty the contents of the fried dace can onto a plate. Then I pick out the bones and cut the fish smaller. Next, I heat up a pan and then throw in my dace, beans, and the oil. Once the fish and oil get hot, I throw in my turnip greens. If you're using a frozen bag of turnip greens, do not thaw first. Throw them in frozen. Let them cook down and give it a good stir. Once the greens are cooked, the dish is done. I don't add any extra seasoning into this dish because the canned dace has a lot of salt in it already.  


Stir Fry Bamboo, Water Chestnuts, and Bell Pepper

I made this dish up on the spot because it was vegetables I had on hand which I could combine together for a cohesive dish. The recipe inspiration came from this recipe. I just sub whatever vegetables I have on hand. I keep canned bamboo and canned water chestnuts in my pantry at all times. There are other dishes I use these canned vegetables for, but they came in handy for this stir fry as well. The bell peppers were some of the last ones to come out of my garden. They were smaller and thinner but still usable. I realize not everyone is going to have a garden of bell peppers. That's not a problem because bell peppers can be frozen! 

Now you can't freeze them whole. The best way to freeze a bell pepper is to wash, remove the seeds and middle, and cut the bell peppers into the size you want to use them. Then, lay them out on flat on a tray and freeze. Once frozen, transfer them to a freezer bag to use when you want them. This is probably true of most vegetables, but you don't want to thaw them before you use them. They'll turn into a soggy mess. These are best for stir frys because you throw them in frozen and the high heat fast cooking method will help to preserve the texture of the vegetable. 

The actual recipe uses much more seasoning than I did for this batch. I just used chicken bouillon in water this time and made a starch slurry to thicken the sauce. 

I hope these dishes inspire you to be able to cook with more vegetables even when you're in a bind or can't make it to the grocery store!

Wednesday, October 22, 2025

Takeout with the Tos #25

Hello again! Since coming back from Chicago, the cooking has been on and off at home because we've been doing some special activities like hosting a friend and going to the State Fair of Texas! This isn't back to sharing a week's worth of food, but I'm sharing a portion of what we grilled this past weekend.

We had a friend over who grilled with my husband and we all ate dinner together. It was fun and delicious. 

Six Pork Kabobs:  $24.00

2 pounds of BBQ wings (approx 14-15 pcs): $18.00

2 pounds of honey soy wings (approx 14-15 pcs): $18.00

5-6 lbs Beef Galbi (not pictured): $100.00

Home Fries (not pictured): $8.00

Total: $168.00

Tax: $13.86

Grand Total: $181.86


Kabobs

Chicken Wings

More Chicken Wings


This grilling extravaganza was definitely a splurge for our friend and us. However, we had a lot of fun cooking and eating together. 

For the honey soy wings, I followed this recipe.  We ended up grilling the wings instead of baking in the oven so it may have added to the varying result. The comments on the recipe raved about it and how great the flavor was. Honestly, I didn't think it was that amazing. Tasty, sure, but definitely not the best wings I've ever had. The BBQ wings were an improvised recipe my husband did on the spot with barbecue sauce and honey. I actually liked the flavor in his wings better. 

The skewers were made up of bell peppers, onion, and pork tenderloin. I was pleased with how they turned out, but surprisingly enough, I actually wished I had more grilled onions and bell peppers. That's the power of smoke and charcoal...

 This was a very delicious meal. It made me want to grill marinated meats more often. I don't know how much my body can handle it as we went on a semi-vegetable detox after this meal. But I'm learning more and more how to enjoy good food. 

As promised from the last post, I totaled the cost of all our "takeout" food from the first three quarters of 2025. The grand total came out to $2,619.24! 

Thursday, October 2, 2025

Takeout with the Tos #24

I cooked a mixture of individual meals as well as some Asian dishes. I've blogged a lot about the Asian dishes I make so this week I'm going to focus on the other meals we had this week. It doesn't encompass all the food we ate this week, but it provides some variety in showing you what we cook and eat in our household.

Mediterranean Stew with Naan (6+ servings) : $50.99 

Burgers and Fries (10 burgers + fries) : $89.99

Flatbread Pizza (4 flatbreads) : $39.96

Total: $180.94

Tax: $14.93

Grand Total:  $195.87


Burgers and Fries

I discovered this recipe for homemade burgers before 2020. It's the only recipe I ever follow when I make burgers because it's so good. When I was pregnant, I would still make this recipe because we could fully cook the burgers and it was still delicious. Last weekend I was having a random burger craving. We had McDonald's for a meal and it wasn't quite satisfying. We ended up making our own burgers for this week and it was really delicious. I made an improvised coleslaw for the burger and we fried some french fries at home with really old potatoes. 🙈 Nobody got sick. They were delicious. 


Flatbread Pizza 

I went grocery shopping one day and found flatbreads on clearance at the grocery store for 50% off. Flatbread is not usually on my grocery shopping list, but this price was pretty good. I also thought quickly on my feet and told myself I'd save it in the freezer for us to make homemade pizza with one day. Well, the day to make homemade pizza came this week! I pulled together this pizza in about a half hour. The flatbread was thawed from my freezer. The cheese was thawed from my freezer. The sausage I tore apart as a topping was from my freezer. The tomato sauce was two cans of tomato paste mixed with some water to thin and Italian seasonings. 

This was a really delicious pizza. It was gone in two meals. I love how I could pull out almost every ingredient from my freezer and those I didn't were shelf stable! I also really enjoyed eating sausage on my pizza instead of the usual pepperoni we would do. Pepperoni is just too greasy after it bakes, and honestly, the sausage adds a nice flavor as well. I'll have to do this again sometime if I can find more flatbread on sale. 


Mediterranean Stew with Naan 

I started putting together this post only to realize I didn't have a photo of the actual stew! Oops. I did get a nice photo of all my spices lined up in a row on the stove ready to be added in.

...and then I got a photo of what the spices looked like dumped on top of the stew. I didn't measure for amounts but it's about 1 tsp - 1 TB of each. 

I've never followed a recipe to make this stew. This recipe was born one day of trying to use chickpeas in a high fiber stew. I include chickpeas, beans, carrots, potato, canned corn, and this time, cabbage. There's a variety of vegetable combinations that could be used for this.

This specific batch has some bacon in it, both for the fat and the flavor since everything else is a vegetarian component.  

Yes, my children eat this. My daughter took it to school for lunch for two days. Yes, they need the naan to bribe them. But I'm thankful to expand their palette and have them eating their fiber at a young age! I will probably never go vegetarian in my lifetime, but I love being able to cook vegetarian options that are tasty to add variety to what we eat.  

The takeout total this week is on the high side, but realistically, this is what we would pay if we ordered all this food as takeout. These burgers are not In-N-Out sized...they are closer to what the Big Mac used to be back in the 90s. McDonald's is selling a Quarter Pounder with Cheese Meal for over $9.50. 😱

I decided to go back and add up the takeout costs from the first 3 quarters of this year. Guess what it came out to? Will reveal in the next Takeout post! 


Thursday, September 25, 2025

Takeout with the Tos #23

It finally happened. I forgot to take pictures of all of my food this week. Oh well. I guess this is what happens when I don't cook everything on the same day. There are no photos of ketchup shrimp or my snow pea tofu stir fry, but I made them on week 12 of this year and it's pretty much the exact same dish. 

Pork Belly Tacos (2lb pork belly): $25.99

Homemade "Ramen" Bowls (4 servings): $35.99

Ketchup Shrimp:  $16.99

Snow Pea Tofu Stir Fry: $14.99

Asian Marinade Chicken Tenders (1.5lb): $20.99 

Total: $114.95

Tax: $9.48

Grand Total:  $124.43


Pork Belly Tacos
 

One of the chefs I enjoy watching on television (and is still airing new episodes) is Pati Jinich. There's many recipes in my collection which are from her cooking shows. We were watching an episode of her show one evening and it was all making us hungry. When meal-planning for this week, we thought about using pork belly as a protein since I had some in the freezer. We also had leftover tortillas which needed to be eaten. I picked up some vegetables from the grocery store and we were able to use our Kewpie dressing.
 
We found this dressing on clearance at the store. I'd never used it before but I do enjoy other flavors of Kewpie dressings. We decided to buy one to try. I used a little in a recipe last week but decided it would make a great taco condiment. 
 
I winged the pork belly marinade. It's a combination of soy sauce, sugar, cooking wine, sesame oil, honey, and a little salt. I wish I had actual amounts to tell you....I don't. I literally just grabbed ingredients and poured some in. For two pounds of pork belly, each ingredient was probably between 1-4TB. I bet you could mix and match between the ingredients I listed above and it would still taste good albeit a different "stronger" flavor. That's one thing I love about Asian cooking. When you have the main staples, any combination of them is going to give you a nice flavor. You just have to know how to control the amounts based on the flavor you actually want.  


I had some pickled banana peppers in my fridge which made a great sour addition to the savory taco.  

Homemade "Ramen" Bowls

We have lots of instant ramen at our house....despite all my cooking with fresh meats and vegetables, we still love a good late night instant noodle when the time calls for it. 

This meal came about on my lightest day of work. We were starting to run low on food - middle of the week - and I thought of something quick and easy with some ingredients I already had on hand. 

The protein for these noodles came from an egg and some spam. Yup, I cook spam. I had frozen broccoli in my freezer so I pulled some out for a quick blanch to reheat and added them in. I cooked the instant noodles and used the seasoning packets from our Mi Goreng. I didn't season any of the add-ins because there would be enough flavor from the instant noodle seasoning and spam. 

My kids ate this so quickly all by themselves with no need for coaxing. I realize it's not the most healthy meal I've ever made, but as a mom, a self-fed meal with no fuss about finishing is a huge win.  

Everyone got their own bowl of this.
 

The ketchup shrimp and snow pea tofu stir fry I made were delicious. Unfortunately I didn't get photos of them. I did use my stainless steel wok  which I had written about earlier this year. I spent a few months away from the stainless steel and back to my nonstick because I got scared after a few bad tries with the wok. The unfortunate part of learning is that you have to keep cooking in stainless steel, even if it means messing up dishes. 

I got brave this week and tried again. The last three dishes - ketchup shrimp, snow pea tofu stir fry, and my chicken tenders were all made using stainless steel. These attempts were much more successful. I think I need to remind myself not to use too high of heat. 

Asian Marinade Chicken Tenders (1.5lb)

This is all that was left when I remembered to take a photo.

Originally, I pulled this chicken out of the freezer to thaw in order to make curry. By the time the chicken thawed, I wasn't in a place to make curry and if I let it stay in the refrigerator for another 15-20 hours, it would begin to go bad. I realize not everyone enjoys freezer meat because they can taste the difference from fresh meat. I don't notice it. However, I do use my thawed meat immediately because the longer it sits in the refrigerator after thawing, the more likely it is to go bad. 

So instead of making curry, I took my chicken and marinaded it - and then put it back into the refrigerator for 36 hours. Once you add something with salt and sugar, the marinade serves as a mini "cure" for the meat which is why it will not spoil so quickly after that. Simply leaving raw unseasoned meat in the refrigerator will go bad after an extended amount of time. 

The seasoning for this chicken was very similar to the pork belly. I think I used the exact same ingredients for the marinade, probably in slightly different proportions because I just dumped everything into the bowl. I like making this because it's a quick, easy protein with lots of flavor that goes well with rice and a vegetable for a balanced meal. 

That's all for this week!

Thursday, September 18, 2025

Takeout with the Tos #22

We had a conglomerate of food this week. It was a little bit of hodgepodge.  

Green Beans and Pork: $14.99

Steak (2 8oz ribeyes) : $39.99

Mashed Potatoes: $8.99

Green Onion Pancake with Shrimp: $24.99

Tortilla Kebabs: $12.99

Total: $101.95

Tax: $8.41

Grand Total:  $110.36


 Green Beans and Pork

I make this dish a lot. It's easy, we have ground pork in the freezer on hand, and it's tasty. These beans were from a friend's garden. I seasoned with salt, sugar, cooking wine, soy sauce, and oyster sauce. I blanch the beans first in salt water to get a softer texture without being fibrous. The salt helps to keep the vibrant green color and actually cooks the beans faster than in unsalted water. 


Steak 

These steaks have been in our freezer for almost a year. I got them on sale last year when I spotted them and vacuum sealed for the freezer. It wasn't our intention to save them for a year, but when I vacuum seal my meats, I'm more at ease about "forgetting" them for long periods of time. My husband cooked these and seasoned with salt, pepper, and garlic. I'm typically not a fan of steak, but when he does it, I'll eat it. This makes me wonder if all the steaks I've ever ordered at restaurants have not been cooked properly. 
Mashed Potatoes 


Mashed potatoes go with steak and we had a lot of potatoes leftover to use. Nothing fancy here - no box mashed potatoes though. An important thing to note is when boiling potatoes, use low heat. Boiling too high will overcook the outside faster, resulting in crumbling outsides. To keep the potato intact, add the potatoes into cold water and bring to a boil, then lower the heat to continue cooking the potato evenly to prevent it from falling apart. Once the potatoes are cooked, we drain the water, add milk, butter, and seasoning. 

Green Onion Pancakes with Shrimp

I bought a giant pack of green onions from Costco a few days prior to making this. I can use up a lot of green onions if I want to, but boy does Costco sell a lot at once in their bag. I ended up using about half the bag of green onions to make these pancakes alone. I've made these many times so I no longer reference a recipe, but the one I started out with was by Maangchi. I've done it many times so I just wing the batter now and look for consistency. I still mess it up every now and then, but that's the errors of being human. These are so good fresh off the pan when they're nice and crispy. 

Tortilla Kebabs 

This recipe popped up on my social media one day. It seemed interesting and was mesmerizing to watch him make. I filed it away in the back of my head. One weekday morning when I was home, we started running low on food options. I had leftover tortillas in the refrigerator from before and decided I was going to make this recipe. 

*Note: I followed the recipe very loosely. I don't have half these ingredients on a whim and I wasn't going out to buy them. So my kebabs are not Lao style. They're simply...Lao inspired.*

My meat filling consisted of: one pound of ground pork, Kewpie onion dressing, lemon pepper seasoning (to replace the lemongrass), salt, sugar, oyster sauce, garlic, cilantro, and green onion. Then I followed the recipe to layer the tortillas and the meat. 

I didn't end up with perfectly flat tortilla squares. Once I filled my meat layers, it did start to sag on the ends. Maybe this goes away with more experience, but I clearly don't have the experience. This came out really delicious for a first try. It definitely took some time to assemble and cook the skewers and they were consumed in a fraction of the time. These types of recipes make me sad, but good food is good food....

Tuesday, September 9, 2025

Takeout with the Tos #21

I'm excited to get back to more consistent takeout blogs, but as I mentioned before, it's going to look a little different. Instead of cooking on Sundays and eating for the week, the cooking will be done....on random days throughout the week. This week's post will actually include cooking from last Friday as well as some in the beginning of this week. 

Collard Greens and Dace: $14.99

Egg Hugging Tofu: $15.99

Ground Pork with Basil: $13.99

Eggrolls (x29 @ $0.75 ea): $21.75

Fried Chicken (2.5 pounds): $20.99

Chinese Broccoli: $12.99

Asian Vegetable Soup (5 Qt @ $5/qt): $25.00

Total: $125.70

Tax: $10.37

Grand Total:  $136.07


Collard Greens and Dace
 
We needed some vegetables and I hadn't gone grocery shopping in a bit due to being out of town. So I pulled out a frozen bag of collard greens. I buy these from the store when they're marked down and the grocery store is speed-selling them. They go into my freezer and I use them at a later date for stir frys. This worked perfectly for us this one. Collard green is definitely not my favorite though. I still prefer turnip greens or even kale when it comes to the American vegetables. Collard greens have thicker leaves which aren't my preference, but with the right cooking technique and seasoning, it's not bad. 
 
 
I've made this recipe a few times since I added it to our rotation a few months back. It's so easy and is a great change from the old teriyaki tofu I made for years and years. I love how the egg adds extra protein to the dish. This was again a quick meal pulled together so no green onions or anything green to make this dish look a little better aesthetically. 
 
 
I was actually excited when I saw Woks of Life post this recipe recently. I had seen their recipe with pork belly and thai basil  before which was a delicious recipe. My problem was that I could never get the texture of the pork belly right because of a combination of heat + cooking time issues. This happens a lot with nonstick because to preserve the integrity of the cookware, you can't use very high heat. As a result, things cook slower, and when this specifically applies to meat, this means you get texture issues. 
 
So when I saw a very similar recipe with ground pork, I was intrigued because I love the flavor of this dish, but I wanted an easier way to do it. Using ground pork means no texture issues with the meat and you still get the flavor of the dish. I compared the recipes side by side and the seasoning proportions are actually identical. There's slight modifications between the two recipes with the other ingredients, but the key seasonings are the same.  
 
Seeing this recipe made me sad I didn't grow basil this summer. I had so much of it in the past and could only use/freeze so much before I was overwhelmed. I planted some seeds last week in hopes of making this dish a few more times the rest of this year, but we'll see how much the weather can cooperate with me as basil grows in hot weather. 
 
 Egg Rolls


Now these aren't the tiny egg rolls. These are the egg rolls that are 5-6 inches long each. I didn't follow a recipe to make eggrolls. This was a very improvised recipe which turned out great. My frying skills and wrapping skills need some work though. I forgot to fill and fold on the diagonal. They turn out a lot neater and prettier that way. Oooooops. I'll have to remember that for next time. Mine have awakward straight seams to the side, some of which wildly popped open during frying and created some wacky waves. 
 
My filling includes half a carrot, 1 pound ground pork, 1 pound shrimp, half a small cabbage, 3-5 cloves garlic, soy sauce, oyster sauce, sesame oil, corn starch, and sugar.  I can't tell you the proportions of everything else because I don't know. I was just dumping things into the mixing bowl. 
 
My first fry turned out super dark. Two are pictured above and I ate the other two. This is when I realized that frying egg rolls at 350+ degree oil is not good. The outside burns and the inside is questionable. That's the reason I tried the dark ones first because I was worried the inside was raw. It wasn't, but it was definitely too fried. 
 
Would I make this again? For sure. We put a good number of them in the freezer and they'll make great quick food for the future. 
 
 
 Fried Chicken

I had originally marinated this chicken to be browned in a pan like a grilled chicken, but since I already pulled out the oil and pot for frying, I decided to fry them. I marinated them in soy sauce, oyster sauce, honey, cooking wine, sesame oil, and corn starch. Again, I can't tell you exact proportions because I just dump everything in, put on some food gloves, and mix it before popping the bowl in the refrigerator for 24 hours. A beginner recipe would be equal parts (1tsp or 1TB depending on amount of food) of all. I was telling my husband I love these seasonings because you can mix them together in random amounts and it will still taste good. I'm sure if you tweak the proportions, you can get a fine-tuned flavor profile depending on what you like, but equal portions of everything is a good place to start. 

I did two different coatings because I ran out of panko halfway through frying. The rest of the chicken is battered in potato starch. 


Chinese Broccoli  


This is a basic parboiled vegetable. I used salted water and dropped in the leaves for maybe 30 seconds. The stems I leave for about 1 minute. Nothing fancy, but parboiled gives it a good texture. The leaves stay bright green and the stems are soft with a little bite to them. 

Asian Vegetable Soup


Earlier this year, I started randomly throwing ingredients together to make soup. This still continues now! This soup includes: tofu puffs, tofu skin rolls, mushrooms, cabbage, carrot, daikon, celery, garlic, soy sauce, dried shrimp, and chicken bouillon for seasoning. It was a little bit of a "stone soup" because the carrot and celery was thrown in to clean out my fridge. I didn't mean for this to be anything fancy, but a warm soup is nice as the weather is cooling down. 
 
I was telling my husband that an Asian soup with fried egg rolls was reminiscent of the quintessential "cheap Chinese restaurant food." I'm not even sure you can get cheap soup and egg rolls anymore at any restaurant due to inflation and tariffs. I'll take my homemade version any day.  

Tuesday, July 15, 2025

Takeout With the Tos #19: Long John Silver's

When I was growing up, takeout wasn't atrociously priced. You could get a family meal to feed four people for around $20 and probably have some leftovers. Sadly, this isn't the case anymore. As a result, my children don't eat out in the same ways I did. This is probably for the better because I believe they eat much healthier than I did as a child. However, this means they're missing out on some of the fond memories I have of eating out of a fried chicken bucket or eating fries at our kitchen table. My cooking initially increased after my first baby was born. We were home a lot during the evenings and cooking became an outlet for me to be creative and "do something." I wrote about the various recipes I tried the year after she was born. 

One thing I've never done was fry fish. I grew up eating Long John Silver's and it was our "justified healthy food" because we were eating fish. I still live next to the same location we went to growing up. For fun, I looked up the prices and they are much higher than they used to be. 

Instead of ordering a 12 pc family meal for $43.79, we fried our own fish, French fries, and hushpuppies from scratch.

Here are the recipes I followed for each of the items.

Fried Fish Batter - The batter is the main part I needed to help with. I fried each batch of fish for about 4 minutes at 350 degree oil. We used tilapia instead of cod or pollock because that's the only white fish we had at home. We also cut our fish in half so they wouldn't fry with a little slit in the middle. 

French Fries - I hand cut my fries and followed the double fry method.

Hushpuppies - Believe it or not, I followed this recipe almost entirely.

Guys...I got too excited after making an entire meal in the style of Long John Silver's....so excited I never got a picture of everything after frying. Instead, I got the remains of the fish and fries after plating up my children's servings.


The fish and fries. 

I never got a picture of all the hush puppies, but here are the ones on my kids' plates. 

As a child, food was sustenance. I ate because I was hungry. Sometimes I liked what I ate, sometimes I didn't. As a young adult, I ate what I could afford. Sometimes this was plain food. Sometimes this was delicious food. Now as a more established adult, I've finally begun to appreciate the power of food and the true meaning of comfort food. 

The prices below are taken from the Long John Silver's a la carte menu. Simply calculating from their family meal accurately accounts for the fish but not the proportion of hushpuppies or fries. Because of this, the price is inflated compared to the meal price, but I did not make three sides, only one. 

12 pieces of fish @ $2.89 each: $34.68

3 orders of hushpuppies (6 pc/order) at $2.79 each: $8.37

6 orders of fries at $2.79 each: $16.74

Total: $59.79

Tax:$4.93

Grand Total: $64.72 

I was able to save about half of everything I cooked in the freezer to be consumed at a later date. The leftovers from the other half will last us about 3 portions. I had fun doing a fish fry. The benefit of this fry batch was these were not coated or wet batters. This allowed the frying oil to stay much cleaner throughout the process and remain usable for longer. I will most likely continue to use bits of the oil in my cooking throughout the week before I dispose of the last remaining portion with the bits on the bottom. 

Total Prep and Fry Time: 2 hours. 

Wednesday, July 9, 2025

Takeout with the Tos #18: Fry Edition

We don't have any streaming services right now. We do have a nice big screen TV and an antenna to get public channels. Occasionally I miss the variety from when we had access to a streaming service. It would have been very easy for us to sign up for a subscription and pick up right where we left off. It would cost us about $20/month and we'd continue the shows we watched from before. However, with us being out of town for two weeks at the time, we decided to wait. I was never opposed to signing up for a subscription, but I knew once we started, there was no going back.
 
When we came back from our trip, there was a period of time when we didn't watch a lot of television. There was just too much to do around the house and we were still tired/jetlagged from our trip.  It wasn't until about a month after returning when we started resorting to the television again. 
 
We haven't started a subscription for anything yet, and honestly, most of the time, there's nothing overly exciting to watch on public channels, but once in a while, there will be a nice gem of a show that's on when we're watching. 
 
This happened at the end of last week. We were browsing channels at night and came across a cooking show talking about Louisiana and seafood. They introduced various restaurants in Louisiana and the food they served. These weren't fancy high-brow restaurants. Most were just basic restaurants serving simple food of the south. I loved watching them talk about oysters. It also made me hungry for some oysters myself. 
 
I had oysters in my freezer. With some thawing technique, I was going to give it a try. The recipe I followed loosely (and boy do I mean loosely) is this one.  
 
If you've followed along with my blog you'll know that I'm a very rustic cook. I don't like following recipes because they slow me down. I either have to memorize enough of it to be simple to execute or it's completely made up. 
 
What I followed from the recipe: a 1:1 ratio of flour and cornmeal
 
What I didn't follow from the recipe: everything else 😂 

I didn't have buttermilk for the recipe, but I also didn't have enough milk to amend into buttermilk (milk + vinegar) so I ended up just leaving that part out. I also did not add seasoning to the oyster or the batter. When using frozen oysters, I learned from a Korean cook to salt them and wash them before using. I thought this would have been enough salt to flavor, but it wasn't. 

The overall fry was great though. 

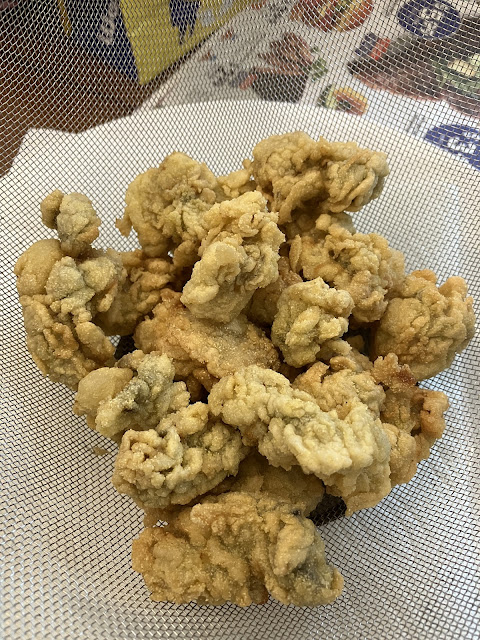
Tasty.

Proof it's an oyster and not chicken in disguise.  

If I did this again in the future, there would be two things I'd make sure of:

1. Add some seasoning. Or wash them in more salt next time, haha. 

2. Fry a little longer. These weren't bad by any means but they got less crispy as they cooled. A longer fry may have helped this. **We've gone to seafood restaurants before and had dried fried seafood so I'm aware of the opposite extreme.**


Now if you know me, I don't waste my frying oil or my extra fry batter. I had both in this case. That same evening, I speed-prepped some shrimp balls for frying. Because there is cornmeal in the batter, it wasn't a true Asian shrimp ball. Think more of a shrimp hush puppy.  But it was improvised on the spot, quick to pull together, and tasted pretty good. 

I don't think these would ever be my main item on my frying list, but they make a good secondary fry to use up extra batter and take advantage of the oil. 


The following day, I continued my frying efficiency by making a batch of chicken karaage. This is the recipe I first used when making karaage, but since then, I just wing it by memory and improvisation now.  

I've breaded it in both potato starch and tapioca starch. Both get good results. 

I love fried food. We never had homemade fried food growing up, but we did fast food. My kids get the opposite. We don't do a lot of fast food, but we have fried food in my freezer on hand. A pipe dream of mine is to never buy freezer chicken nuggets again and to always have enough karaage in my freezer. My kids consume a lot of chicken nuggets, so this is a lofty goal, but maybe in the future when they can significantly help in the kitchen, this will be possible. 

As for our health, everything in moderation, right? Not all of this (except the oysters) were consumed in one sitting.

Fried Oysters x18: $20.99

Shrimp Balls x11: $15.99

Chicken Karaage (1.5 lb): $14.99  

Total: $51.97

Tax: $4.29

Grand Total:  $56.26